Yoga for the Hips
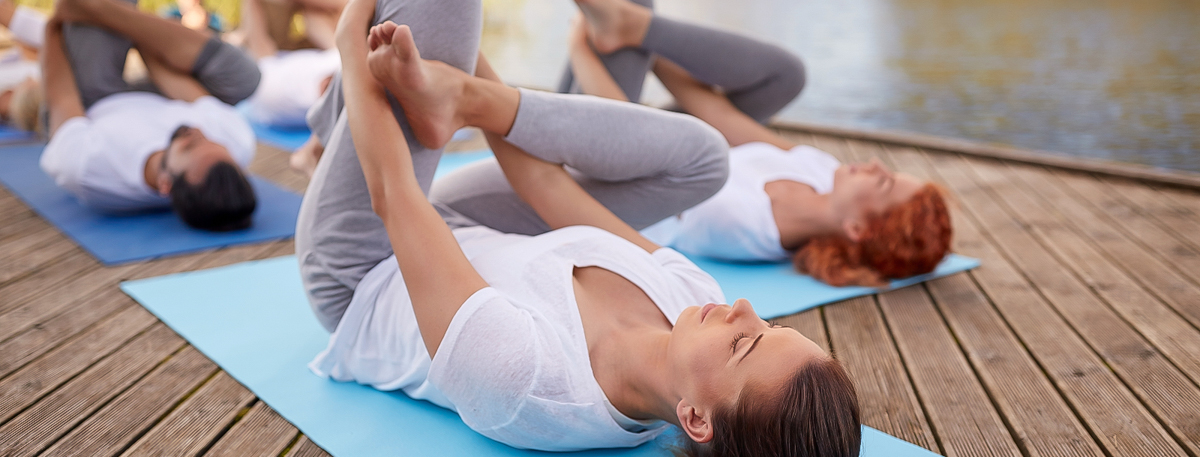
This beautifully flowing sequence of seven yoga poses is designed to lubricate the hip joints, increase range of motion and ensure ease of movement. Providing a myriad of physical benefits that lay the foundation for the practice of all other asanas, yoga for the hips creates agility, suppleness and flexibility that goes beyond the tangible.
The spiritual home of the emotions, creativity, sensuality and desire is the Sacral Chakra, otherwise known as Svadisthana, or the ‘Dwelling Place of the Self.’ Dictating how we relate to ourselves and to others, it is directly associated with the pelvic region, reproductive organs and of course, the hips. Being one of the largest joints in the human body, the hips can store an incredible amount of toxins, anxieties, tension and repressed emotions. Therefore, yogic poses that encourage the openness of the hips not only liberate hidden emotions, release toxins and lubricate the joints, but also restore balance and harmony to the Sacral Chakra.
Follow these delightful hip opening yoga poses to cultivate healthy self-expression, revive creative potential and ensure harmonious relationships in life.
Eye of the Needle Pose
(Sucirandhrasana)

From the Sanskrit words Suci, meaning ‘needle’ and Randhra, meaning ‘hole,’ the Eye of the Needle pose is one of the safest asanas to open the hips, lengthen the hip flexors and even ease lower back pain. The fact that it is performed from a reclining position offers full control over the degree of intensity, thus making it an effective pose for both beginners and seasoned yoga practitioners.
- Start in a reclined position with the knees bent, the spine extended along the length of the mat, the neck long and the soles of the feet on the floor.
- Hug the right knee into the chest. Breathe.
- Then cross the right leg over the body and place the outside of the right ankle on the left thigh. Keeping the right foot flexed, use the right palm to gently encourage the right knee outward away from the torso, just to the point where you feel a nice mild pressure. Release.
- Now raise the left foot off the floor and thread both hands around the left thigh, knee or shin, allowing the fingers to interlace.
- With both feet flexed to protect the knees, simply engage the biceps and bend at the elbows, drawing the knee closer to the body as the hips gradually open up. Avoid tilting the head back or lifting the upper back/shoulders off the mat by keeping the chin tucked in just a little. This ensures that the lower back remains on the mat and the neck and spine stay long.
- Take a few deep breaths, enjoying the pose.
- Release and unwind back into a reclined position.
- Repeat on the other side.
Happy Baby Pose
(Ananda Balasana)
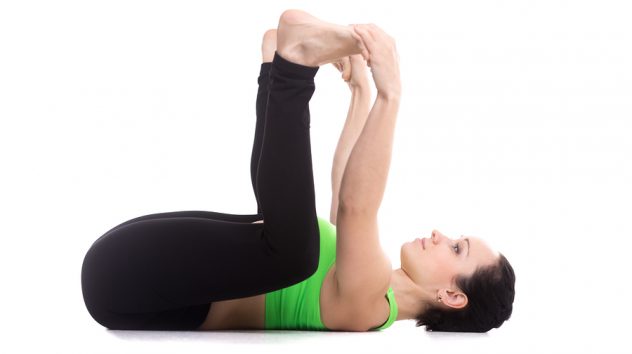
Ananda means ‘bliss’ and Bala means ‘child’ in Sanskrit. Being such a liberating and playful asana, it’s no wonder that the class sometimes erupts into a slight tremor of giggles during this pose! Beautifully releasing the lower back and opening the hips, this posture is also a wonderful way to overcome fatigue, relieve stress and calm the mind.
- From a reclined position, bend the knees and hug them into the chest. Breathe.
- Hold the outside of the feet with both hands. Open the legs so that they are slightly wider than the width of the chest and the knees reach the armpits. Keep the lower back flat on the mat, the neck long and the chin slightly tucked in so that the head doesn’t roll back.
- Keeping the knees toward the armpits, flex the feet, lift them up into the air and push them into the hands so that the shins are perpendicular to the floor. The opposing forces of the feet pushing up and the hands pulling down gently stretches and opens the hips.
- Breathe deeply for several seconds and enjoy the pose.
- Release the feet, hug the knees back into the chest and return to a reclined position on the back.
Bound Angle Pose
(Baddha Konasana)
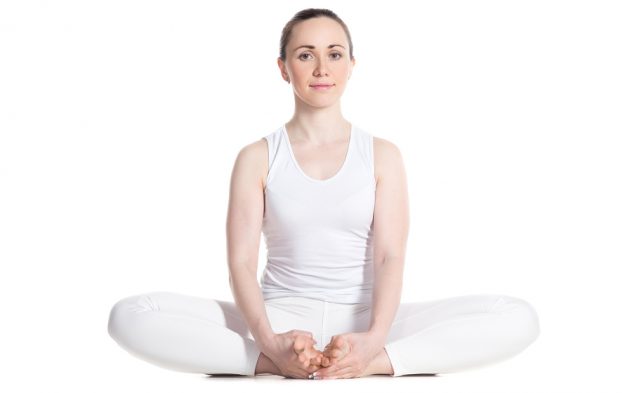
Derived from the Sanskrit words Baddha, meaning ‘bound’ and Kona, meaning ‘angle,’ this energizing asana is also known as the Cobbler’s Pose, as it resembles the sitting position adopted by cobblers repairing shoes on the street side. Regular practice stretches the hips, groins and knees, improves blood circulation and is considered to be a boon for the reproductive organs and systems.
- Sit up into Staff Pose with the legs stretched out in front of you. At any time, if you feel like the lower back is collapsing, sit on a pillow or roll up your mat underneath the sitting bones.
- Bend the legs and bring the soles of the feet together, allowing the knees to fall apart to either side. Draw the feet in comfortably toward the body.
- Consciously lengthen the spine, open the chest and pull the shoulders back and down away from the ears. Bring your attention to releasing the tops of the thighs. This will naturally bring the knees further down. Keeping the outer edges of both feet firmly onto the mat, use the hands to open the feet like a book.
- Breathe naturally for several seconds. Allow the pose to deeply stretch the hips and open the groins.
- Release and return to Staff Pose.
Forward Bend in Half Lotus
(Adho Mukha Ardha Padmasana)

Adho Mukha, or a ‘downward facing’ position while in Ardha Padmasana, or ‘Half Lotus,’ provides an intense and deep opening of the hips, knees and ankles, leading to effective lubrication of the joints and greater suppleness of the lower body. In addition to calming the mind, it is an excellent posture to relieve stiffness and warm up the legs in preparation for asanas.
- From Staff Pose, bend the left leg and bring the sole of the left foot against the top of the inner right thigh.
- Now bend the right leg and with the help of both hands, lift the right foot slightly and place it on top of the upper left thigh. Use the right palm to carefully encourage the right knee down, just to the point where you feel a nice mild pressure. Release.
- Lengthen the upper body from the base of the spine all the way up to the crown of the head. Pull the shoulders back and down and allow plenty of space around the neck and ears. Allow the knees to fall open onto the mat.
- Bend at the hips and walk the hands all the way forward, ensuring that the sitting bones remain squarely on the mat and the spine is lengthened.
- Close the eyes, relax the shoulders and take several breaths, allowing a deep opening of the right hip.
- Walk the hands back up and unwind into Staff Pose. Shake out the knees to release any tension.
- Repeat on the other side.
Half Pigeon Pose
(Ardha Kapotasana)
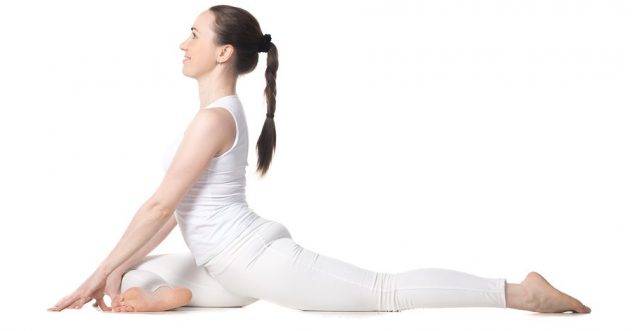
This powerful hip opener not only encourages external rotation, but simultaneously lengthens the psoas, making it one of the most advantageous poses to increase flexibility, fully open the hips and prepare the body for more advanced asanas. Translated as ‘half pigeon’ in Sanskrit, it also alleviates sciatic pain, improves the posture and serves as a blessing for the reproductive system.
- Come up onto all fours with the hands about shoulder-width apart and the knees about hip-width apart.
- Slide the right knee forward in line with the inner edge of the right hand.
- As the right leg folds and the hips lower down toward the floor, slide the right foot off to the left so that the pelvis has space to settle comfortably onto the mat. Bring the hands on either side of the hips, pull the shoulders down, lengthen the spine and neck and open the chest. Stretch and straighten the left leg back and out further, anchoring and squaring the hips evenly onto the mat. Avoid dropping the weight on one side of the hips or tilting the pelvis toward the front leg.
- Now deepen the pose by walking the hands forward while keeping the spine lengthened. If you feel comfortable, walk them all the way forward until your forehead rests onto the mat. You should feel your right knee snug against the right side of your chest.
- Stay in the pose for several seconds, breathing deeply. With each exhalation, allow gravity to sink the weight further down into the hips, opening them up even more.
- On an inhale, walk the hands back and lift back up onto all fours.
- Repeat on the other side.
Lizard Pose
(Utthan Pristhasana)
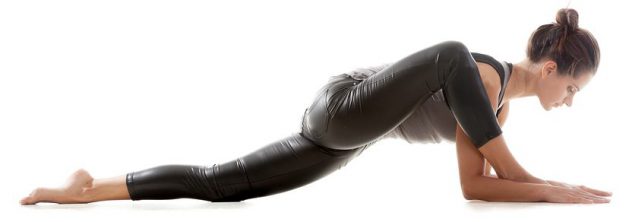
Lengthening the muscles of the legs and deeply stretching and opening the hips, hip flexors and groin, the Lizard Pose – named after its resemblance to the reptile – serves as a powerful asana to boost metabolism, energize the body and relieve stress. In Sanskrit, Utthan means ‘to stretch out’ and Pristha means ‘the back of the body.’
- Stretch back into an Inverted V Pose.
- On an inhale, step the right foot forward into a lunge. The foot can either be aligned to the inner edge of the right hand so that the knee is in between the arms, or to the outer edge of the right hand so that both arms end up to left of the right leg.
- Lower the left knee to the ground and stretch out the left foot so that the toes point straight back.
- Sink the weight down into the hips. Make any adjustments necessary to ensure that the head and neck are in line with the spine and that the weight is evenly distributed across both sides of the hips. The sole of the right foot should be flat on the mat and the right knee should not extend over the right foot, nor should it splay outwards.
- Keeping this alignment, lower down onto the forearms and sink the weight further down into the hips.
- Take a few deep breaths, enjoying the pose.
- Lift up onto both palms and pull back into an Inverted V Pose.
- Repeat on the other side.
Sitting Pose
(Upavesasana)
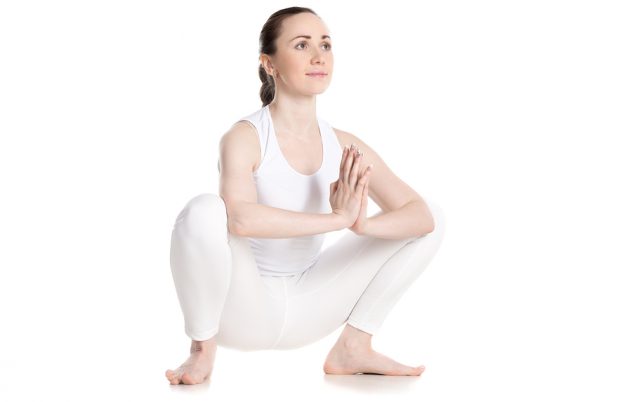
From the Sanskrit word Upavistha meaning ‘seated,’ this posture is commonly known as the Squat and is recognized as a popular exercise to tone the backside, activate the core and strengthen the legs. From a yogic perspective, however, the benefits go much further than that.
Asian countries, especially on the Indian subcontinent, have lower cases of hip replacements and osteoporosis because squatting is a typical sitting position and is adopted during regular day-to-day activities. This asana not only aids the process of digestion, menstruation and elimination through the downward flow of energy, but also contributes to flexible knees and ankles, increases mobility in the hips and lubricates the hip joints.
- Come to a standing position. Separate the feet a little wider than hip-distance apart.
- Bend the knees and lower the hips into a squat, bringing the torso closely between and slightly in front of the thighs. Ensure that the soles of the feet, including the heels are flat on the floor. If the heels do not reach the floor, roll up the mat underneath the heels for support.
- Bring the palms together in Anjali Mudra. With the shoulders down and away from the ears, lengthen the spine from the hips up, broaden the chest and gently encourage the inner thighs to open with both elbows.
- Take a few deep breaths, enjoying the pose.
- Release the hands and place them on the mat in front of you.
- Straighten the legs into a Standing Forward Bend. Then slowly roll up, vertebra-by-vertebra, into a standing position.
Remember that it is always best to practice these asanas and pranayamas under the guidance of a certified instructor. As long as you have a happy disposition, patience, optimism, a positive attitude and an approach that comes from self-love, any exercise will always show better results!

I’ve had multiple minor problems and injuries related to tight hips, hamstrings, etc., and I detest stretching, so it was never a surprise when they occurred. While living in Spain recently, I began going to yoga classes. Here’s my biggest challenge: how do I maintain ‘regular and consistent practice’ at home? I know the responsibility is ultimately my own, and it’s really a no-brainer when you think about the positive results you can achieve if you stretch or practice yoga consistently. My muscles are so tense and tight, however, that it constantly feels like a chore or like I’m doing it wrong. Any suggestions? (Maybe I’ll go back to the ‘listen to a podcast and do it’ strategy haha) Thanks for the great information!
Well, just like anything you want to see results in, you need to keep practicing. Don’t expect too much all at once, just do a little bit each time, and without a doubt, you will notice a change! Listening to podcasts may give you motivation, but at the end of the day, you need to get on the mat and do the work yourself.
Consistency and baby steps, Jason.
I recently started yoga to help with my hips, SI joint, piriformis area on the right side. I had a severe back injury a few years ago and am working to gain flexibility, balance and strength in that area. I am really enjoying yoga, I have never done this before. The poses that you mentioned, some of them I am not quite there yet, but my goal is to be able to do them all. Eye of the Needle Pose, Happy Baby and Bound Angle Pose are some of the ones I am able to do. Still working on the others, Lizard pose is coming slowly! Anyway, I love the information you have here, it’s a great read. I will bookmark this page for sure. Currently my favorite pose is Corpse Pose LOL, that means we are almost done with the class. I honestly can’t believe how hard yoga is, and how beneficial it is. Thanks again.
You’re welcome! Happy practicing!
Thanks for the great detail with each of the poses. I have a lot of hip pain on my left side but I also have a pinched nerve in my low back. Will any of these poses help my low back?
It most certainly will! Remember to practice under the guidance of a qualified yoga teacher in order to get the most of your practice and to avoid any further injury to your lower back.
Thank you so much for such an informative post. I always have stiff hips and lower back pain after standing for a long time while teaching. I am definitely going to try this!
Please do, and keep us updated on how it goes!
This a great post. I often times have stiff joints from weight lifting. I will use this yoga routine to help loosen my hips. Thank you for sharing.
You’re welcome Chad!